
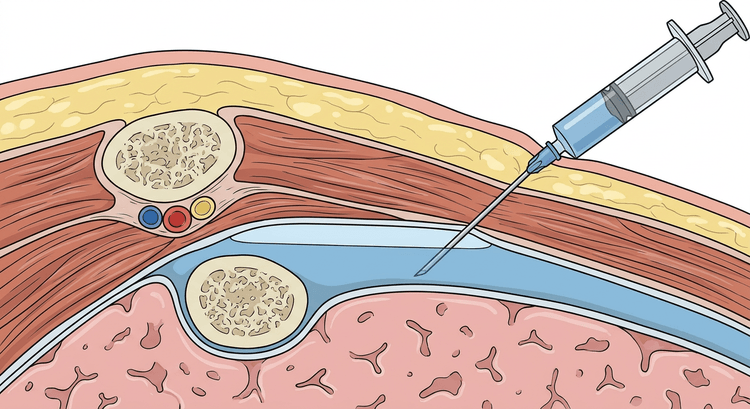
Almost all the complications of pleural aspiration arise from two errors: the needle is placed in the wrong site, and too much is drained. Bedside ultrasound immediately before the puncture markedly reduces the risk of pneumothorax and is now the standard — puncture on the basis of percussion and a chest radiograph alone belongs to an earlier era. The needle is inserted close to the upper border of the rib, never at the lower border where the neurovascular bundle lies, and the drainage is stopped for coughing, chest pain, or when the volume limit is reached.
Indications
- Diagnostic aspiration: a new pleural effusion of unclear cause. An effusion not confidently explained by heart failure must be aspirated.
- Suspected empyema or complicated parapneumonic effusion.
- Suspected malignancy, tuberculous pleurisy or chylothorax.
- Therapeutic aspiration: dyspnoea caused by a pleural effusion, whatever the aetiology.
- Chest drainage: empyema, complicated parapneumonic effusion with a pH below 7.20, haemothorax, a symptomatic or large pneumothorax, recurrent malignant effusion (often combined with pleurodesis), and in chest trauma and postoperatively.
- Emergency needle decompression: a clinical suspicion of tension pneumothorax in a haemodynamically or respiratorily unstable patient.
Contraindications
In tension pneumothorax and in empyema there are no absolute contraindications — the procedure is life-saving and necessary respectively. Otherwise:
| Type | Contraindication |
|---|---|
| Absolute | No safe pocket of fluid to puncture (no ultrasound-verified fluid) |
| Relative | Uncorrected coagulopathy or thrombocytopenia |
| Relative | Ongoing anticoagulant treatment — plan the aspiration for the trough level or pause the drug according to local practice |
| Relative | Skin infection, herpes zoster or burns over the puncture site |
| Relative | Mechanical ventilation with a high PEEP (an increased risk of pneumothorax; ultrasound guidance is mandatory) |
| Relative | A very small or loculated effusion — consider image-guided puncture in the radiology department |
The thresholds for the INR and the platelet count vary between regions. Common practice is correction at an INR above 1.5 and a platelet count below 50 × 10⁹/L before drain insertion, while diagnostic aspiration with a fine needle is tolerated at considerably worse values. Follow the local protocol.
Preparation and equipment
- Ultrasound with a curved array or linear probe.
- Sterile clothing: gown, gloves, cap, mask, fenestrated drape. Chlorhexidine in alcohol 5 mg/mL.
- Local anaesthesia: lidocaine 10 mg/mL, 10–20 mL, a 25 G needle for the skin weal and a 21 G needle for the deeper layers.
- Diagnostic aspiration: a 21 G (green) or 22 G needle, a 50 mL syringe, a three-way tap.
- Therapeutic aspiration: a commercial aspiration set or a 6–8 F pigtail catheter, a drainage bag or a vacuum bottle.
- Drainage: a chest drain, an underwater seal unit, suture material, a size 11 scalpel, artery forceps.
- Sample tubes according to the table below, and blood culture bottles.
- Suction and oxygen to hand.
The patient sits leaning forward with the arms on a table for diagnostic and therapeutic aspiration; for drain insertion the supine position is used with the arm abducted and the hand behind the head.
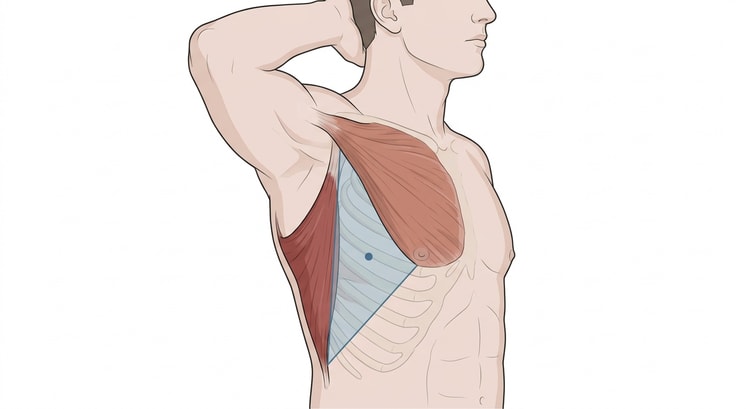
All drains are inserted within the safe triangle (Figure 1). Outside it the risk of injuring the diaphragm, liver, spleen or internal thoracic artery increases. For diagnostic aspiration the point chosen is instead where the ultrasound shows the most fluid, usually in the scapular line one to two intercostal spaces below the upper border of the fluid, but never below the ninth rib.
Procedure
Ultrasound localisation
- Scan in the position in which the patient is to be punctured. Identify the diaphragm, the liver or spleen, the lung and the fluid level.
- Choose a point with at least 15 mm depth of fluid throughout the respiratory cycle and where the lung does not come up against the probe on inspiration.
- Measure the skin-to-pleura distance on the screen; it determines how far the needle is to be advanced.
- Mark the puncture site. Do not let the patient change position afterwards — the mark then becomes worthless.
Diagnostic pleural aspiration
- Sterile preparation and draping.
- Anaesthetise the skin, the subcutis, the intercostal muscle and the parietal pleura. Aspirate throughout the advance: when pleural fluid appears in the syringe you know both that you are in the right place and how deep to go.
- Introduce the puncture needle perpendicular to the skin, close to the upper border of the lower rib, with continuous aspiration.
- Aspirate 30–50 mL. For a cell count and chemistry alone, less is sufficient; cytology requires a large volume and should preferably have 50 mL or more.
- Withdraw the needle while the patient holds their breath in expiration or performs a gentle Valsalva manoeuvre. Cover with a dressing.
Therapeutic aspiration
- Localise and anaesthetise as above.
- Use an aspiration set with a catheter over a needle, or the Seldinger technique — not a steel needle left in place, since the lung can then be pierced as it expands.
- Attach a three-way tap and a collection system and drain slowly.
- Stop for coughing, chest pain, a sensation of pressure or dyspnoea — these are signs that the lung has come up against the catheter or that the pleural pressure is falling too fast.
- Drain no more than 1–1.5 litres at any one time unless the pleural pressure is being measured. If more has to come off, do it on another occasion the following day.
- Document the volume drained, its appearance and the patient's tolerance.
The volume limit exists because of re-expansion pulmonary oedema, an uncommon but serious complication in a lung that has been collapsed for a long time and expands rapidly. The symptoms — cough, dyspnoea, hypoxia, sometimes frothy sputum — appear within hours of the aspiration.
Chest drain insertion
- The insertion site is chosen within the safe triangle, as a rule in the fifth intercostal space in the anterior or mid-axillary line.
- Sedation and analgesia according to local practice, with generous local anaesthesia down to the pleura.
- The Seldinger technique with a small drain (8–14 F) is the first choice in pneumothorax, malignant effusion and most empyemas, and is considerably less painful than blunt dissection.
- A large-bore drain (24–32 F) via blunt dissection is used in haemothorax, in trauma, and when thick pus cannot be drained through a small drain. Never insert a trocar by force — dissect over the upper border of the rib, enter the pleura with artery forceps, and then insert the drain with a finger as a guide.
- Connect to an underwater seal. Check that the fluid column in the seal swings with respiration — the absence of swing usually means the drain is misplaced or blocked.
- Secure the drain with a suture and a dressing. A chest radiograph after insertion to verify the position and the effect.
- Suction (usually −10 to −20 cm H₂O) is applied for a persistent air leak or incomplete expansion, not routinely.
Emergency needle decompression in tension pneumothorax
This is a clinical diagnosis that must not be delayed by radiography: unilaterally absent breath sounds, hypotension, distended neck veins, tracheal deviation (a late sign), and rising airway pressures in the ventilated patient.
- Insert a large-bore cannula, at least 14 G and at least 5 cm long — a shorter cannula does not reach the pleura in many adults.
- Insertion site: the fourth or fifth intercostal space in the anterior to mid-axillary line, that is, within the safe triangle. The second intercostal space in the mid-clavicular line is an alternative but has a higher proportion of failed decompressions because of the thicker chest wall.
- Insert the cannula close to the upper border of the rib until air escapes. Leave the plastic cannula in place and withdraw the stylet.
- Needle decompression is a temporary measure. A chest drain must be inserted immediately afterwards.
flowchart TD
  A[Pleural fluid aspirated] --> B{Pleural protein/serum protein ratio above 0.5?}
  B -- Yes --> E[Exudate]
  B -- No --> C{Pleural LDH/serum LDH ratio above 0.6?}
  C -- Yes --> E
  C -- No --> D{Pleural LDH above two thirds of the upper reference value in serum?}
  D -- Yes --> E
  D -- No --> T[Transudate]
  T --> T2[Heart failure, hepatic cirrhosis, nephrotic syndrome, hypoalbuminaemia]
  E --> E2[Infection, malignancy, pulmonary embolism, tuberculosis, rheumatic disease, pancreatitis]
Interpreting the pleural fluid
Light's criteria distinguish an exudate from a transudate. The fluid is an exudate if at least one of the three criteria in the pathway above is met. The criteria have a high sensitivity for exudates but wrongly classify about a quarter of all transudates as exudates, above all in patients with heart failure on diuretics. Where there is a strong clinical suspicion of heart failure despite classification as an exudate: calculate the albumin gradient between serum and pleural fluid — a gradient above 12 g/L indicates a transudate.
| Finding | Suggests |
|---|---|
| Cloudy, foul-smelling fluid; pH below 7.20; glucose below 3.3 mmol/L; a markedly raised LDH | A complicated parapneumonic effusion or empyema — drain it |
| Pus on aspiration | Empyema — drain it whatever the other results |
| Bloodstained fluid with a haematocrit above half that of the blood | Haemothorax |
| Milky fluid with triglycerides above 1.24 mmol/L | Chylothorax |
| A lymphocyte predominance | Tuberculosis, malignancy, a chronic process |
| A neutrophil predominance | Acute infection, pulmonary embolism, pancreatitis |
Sample tubes and analyses
| Analysis | Tube or container | Comment |
|---|---|---|
| Protein, LDH, albumin, glucose | A plain tube (serum tube) | Take a simultaneous blood sample for serum protein and serum LDH — otherwise the ratios cannot be calculated |
| Cell count and differential | EDTA tube | Send promptly; the cells break down |
| pH | A blood gas syringe, free of air, straight to the blood gas analyser | Contamination with air or local anaesthetic gives a false value |
| Cytology | A large tube or container, preferably 50 mL or more | The volume determines the yield; repeat the aspiration if the result is negative and the suspicion persists |
| General culture | A sterile tube and blood culture bottles, aerobic and anaerobic, at the bedside | Blood culture bottles increase the yield in empyema |
| Tuberculosis | A sterile tube for mycobacterial culture and PCR | Low sensitivity in fluid; pleural biopsy gives a higher yield |
| Triglycerides, amylase | A serum tube | For milky fluid, and for suspected pancreatitis or oesophageal rupture respectively |
Complications
| Complication | Comment |
|---|---|
| Pneumothorax | The commonest serious complication; the risk falls markedly with ultrasound guidance |
| Bleeding, haemothorax | Usually from the intercostal artery after puncture at the lower border of the rib |
| Re-expansion pulmonary oedema | After too large or too rapid an aspiration |
| Vasovagal reaction | A seated patient; observe after aspiration |
| Infection, empyema | Sterile technique and early removal of the drain |
| Injury to the liver, spleen, kidney or diaphragm | With a puncture site that is too low or outside the safe triangle |
| Subcutaneous emphysema | Around a leaking drain or a misplaced side hole |
| A catheter fragment left in the pleura | Never withdraw a catheter back through the needle |
Aftercare and follow-up
- A chest radiograph is no longer mandatory after an uncomplicated ultrasound-guided diagnostic aspiration in an asymptomatic patient breathing freely. Take a radiograph in new dyspnoea, chest pain, cough, aspiration of air, several attempts at puncture, or after aspiration in a ventilated patient.
- After drain insertion: always a chest radiograph.
- Observe for at least an hour after a therapeutic aspiration. The patient should seek help for increasing breathlessness, chest pain or fever.
- The drain is removed once the air leak has stopped, the output is below the locally determined threshold, and the lung is expanded on the radiograph. Remove it in expiration or during a Valsalva manoeuvre and close the skin opening.
- An exudate with no explanation after the first aspiration requires further investigation — CT of the thorax, repeat cytology and, where appropriate, thoracoscopy with pleural biopsy. In recurrent malignant effusion, consider pleurodesis or a tunnelled pleural catheter.
Common pitfalls
- Puncture without ultrasound, or with ultrasound performed in a different position from the one in which the patient is punctured.
- A puncture site at the lower border of the rib instead of close to the upper border — that is where the neurovascular bundle lies.
- Too low a puncture. The diaphragm sits higher than one thinks in expiration; never go below the ninth rib, and never outside the safe triangle for drain insertion.
- Too large a volume drained. Symptoms during the aspiration are a stop signal, not something to work through.
- The simultaneous blood sample forgotten for protein and LDH — Light's criteria cannot then be applied and the aspiration has to be repeated.
- Too small a volume for cytology.
- Radiography before needle decompression in an unstable patient with clinical tension pneumothorax.
- Too short a cannula for needle decompression — a standard intravenous cannula does not reach in many adults.
- Leaving needle decompression as the definitive measure without inserting a drain.
- An underwater seal that does not swing dismissed as normal instead of being investigated as a malposition.