
What determines the outcome of a central venous catheter insertion is decided before the needle goes in: the choice of site, the use of ultrasound throughout the puncture, and maintaining maximal barrier precautions without shortcuts. The most common serious error is dilating a vessel that turns out to be an artery — everything in the technique is designed to make sure that never happens, and to make sure the catheter does not become the patient's next focus of infection.
Indications
- Infusion of vesicant solutions: vasopressors, concentrated potassium, cytotoxic drugs, parenteral nutrition.
- The need for several simultaneous, incompatible infusions.
- Haemodialysis, plasmapheresis or other extracorporeal therapy (requires a large-bore dialysis catheter, not an ordinary triple-lumen catheter).
- Measurement of central venous pressure and central venous oxygen saturation.
- Repeated blood sampling during intensive care.
- Exhausted peripheral venous access during prolonged intravenous therapy.
The need for central access is not in itself an indication for emergency insertion in an unstable situation: intraosseous access or a large-bore peripheral cannula bridges the gap until conditions are controlled.
Contraindications
In life-threatening conditions all contraindications are relative — but they govern which site is chosen.
- Infection, burns or trauma over the insertion site.
- Thrombosis or known stenosis in the target vessel.
- Coagulopathy or ongoing anticoagulation: choose a compressible vessel (the internal jugular or femoral vein), not the subclavian. Thresholds for INR and platelet count before insertion differ between regions and departments — follow local protocol.
- Severe lung disease or a contralateral pneumothorax: avoid the subclavian and jugular routes on the healthy side, since a pneumothorax there would be poorly tolerated.
- A patient who cannot lie flat or cannot cooperate — consider sedation, a different position or a different vessel.
Choice of site
| Vessel | Advantages | Disadvantages |
|---|---|---|
| Internal jugular vein (right) | Best ultrasound conditions, a straight course to the superior vena cava, compressible if bleeding occurs, low risk of pneumothorax | Uncomfortable for an awake patient, harder to keep the dressing clean with a tracheostomy or copious secretions |
| Subclavian vein | Most comfortable for the patient, the most stable dressing, lowest risk of infection and thrombosis with prolonged dwell time | Highest risk of pneumothorax, the vessel cannot be compressed after arterial puncture, technically more difficult with ultrasound |
| Femoral vein | Fastest, and does not interfere with ongoing CPR or airway management, no risk of pneumothorax | Highest risk of thrombosis and contamination, immobilises the patient |
The right internal jugular vein is the first choice in most situations. The femoral vein is the right choice in cardiac arrest and in the uncontrolled emergency — but it should be changed or removed once the situation has stabilised.
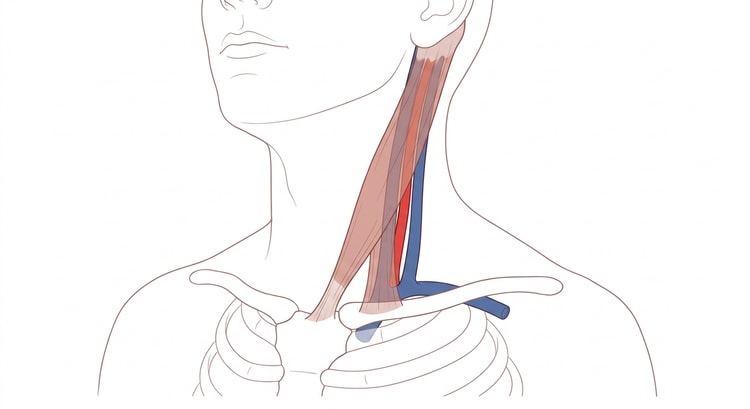
Preparation and equipment
- A central line set with a triple-lumen catheter, usually 7 Fr. Catheter length: the right internal jugular vein requires the shortest catheter, while left-sided and femoral insertions require longer ones — check the length in the set against the chosen side.
- An ultrasound machine with a high-frequency linear probe, a sterile probe cover and sterile gel.
- Chlorhexidine in alcohol 5 mg/mL for skin disinfection. Allow it to air-dry completely before puncture.
- Maximal barrier precautions: cap, mask, sterile gown, sterile gloves and a large full-body drape.
- Lidocaine 10 mg/mL for local anaesthesia, normal saline to flush all lumens, suture material or a securement device, transparent dressing.
- Monitoring throughout the procedure: ECG, pulse oximetry and blood pressure.
Before puncture: check the coagulation status, give information and obtain consent if the patient is awake, and scan the vessel with ultrasound before you drape — a thrombosed or non-compressible vein changes the plan while that is still easy.
Procedure
The description applies to the right internal jugular vein; the principle is the same for the other vessels.
- Place the patient in 10–15 degrees of Trendelenburg for insertion in the neck or below the clavicle. This fills the vein and reduces the risk of air embolism. For femoral insertion the patient lies flat instead, with the leg slightly externally rotated.
- Turn the head slightly to the opposite side. Marked rotation places the artery beneath the vein and should be avoided.
- Identify the vein with ultrasound in the transverse plane: the vein is thin-walled, compressible and non-pulsatile, the artery round, pulsatile and not compressible. Note where the artery lies in relation to the vein.
- Maximal barrier precautions, skin disinfection, full-body drape, sterile probe cover.
- Local anaesthesia in the skin and subcutaneous tissue.
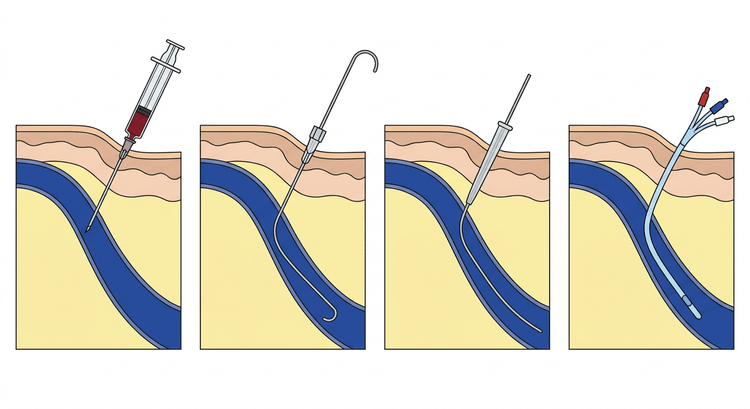
- Puncture under continuous ultrasound guidance and follow the needle tip all the way into the vessel. Aspirate as the needle is advanced; free-flowing dark blood at low pressure indicates a vein.
- Steady the needle, remove the syringe and cover the needle hub with a finger between steps. Introduce the guidewire, which should slide in without resistance. Confirm with ultrasound that the guidewire lies within the vein — in both transverse and longitudinal planes.
- Watch the ECG monitor: the guidewire must not be advanced so deep that arrhythmias occur. Never let go of the guidewire.
- Make a small skin incision beside the guidewire and pass the dilator over the wire, through skin and subcutaneous tissue only. Never dilate before the position within the vein has been confirmed.
- Thread the catheter over the guidewire, withdraw the wire and check that it is intact. Aspirate and flush all lumens.
- Secure the catheter, apply a transparent dressing and document the insertion site, catheter size, depth, number of puncture attempts and any complications.
If the artery is punctured
After puncture with a thin needle: withdraw the needle and compress for at least 5–10 minutes. If a dilator or catheter has been introduced into the artery by mistake — leave it in place and contact a vascular surgeon or interventional radiologist immediately. Uncontrolled withdrawal from a dilated arterial injury can cause massive haemorrhage or a mediastinal haematoma.
Confirming the position
The catheter tip should lie in the lower part of the superior vena cava, at the junction with the right atrium — parallel to the vessel wall, not abutting it. After insertion in the neck or below the clavicle, a chest radiograph is obtained to check the catheter position and exclude a pneumothorax. Lung ultrasound showing preserved lung sliding bilaterally argues strongly against a pneumothorax and can be performed immediately at the bedside, but does not replace a radiograph where local protocol requires one. Femoral catheters need no radiographic check.
Complications
| Complication | Comment |
|---|---|
| Arterial puncture | The most common; dangerous only once the vessel has been dilated |
| Pneumothorax | Mainly with the subclavian route, then the jugular; onset may be delayed |
| Haematoma | May compromise the airway in the neck — watch for swelling and stridor |
| Air embolism | Prevented by the Trendelenburg position and by never leaving a catheter open |
| Arrhythmia | From the guidewire or catheter in the atrium; withdraw it |
| Malposition | Catheter passing up the jugular vein or across into the contralateral vessel |
| Thrombosis | Most common femorally, least common with the subclavian route |
| Catheter-related infection | See below |
| Retained or sheared guidewire | Always count the parts and check the length of the wire |
Aftercare and follow-up
- A transparent dressing allowing daily inspection of the insertion site; change it when it loosens, becomes damp or is soiled.
- Disinfect the injection port before every use and keep the system closed. Catheter-related infections more often originate from handling of the connectors than from the insertion itself.
- Reconsider the need for the catheter every day and remove it as soon as it is no longer needed. Dwell time is the single most important risk factor for infection.
- Routine scheduled catheter changes do not reduce the risk of infection and are not recommended.
- In fever without another focus in a patient with a central line: take blood cultures from both the catheter and a peripheral site and decide whether the catheter should be removed. Marked sepsis, septic shock or pus at the insertion site indicate immediate removal.
- On removal: lay the patient flat or in slight Trendelenburg, ask the patient to hold their breath in expiration during withdrawal, compress and apply an occlusive dressing — air embolism occurs more often on removal than on insertion.
Common pitfalls
- Dilating before the guidewire position within the vein has been confirmed. The one step in the procedure that regularly leads to disaster.
- Using ultrasound only to locate the vessel before puncture and then needling without image guidance.
- Marked head rotation, which places the carotid artery directly beneath the vein.
- Judging the colour of the blood as the sole arterial/venous discriminator — in a hypoxic patient arterial blood is dark.
- Compromising barrier precautions because there is a hurry; if the hurry is that great, the answer is intraosseous access or a femoral catheter, not less sterility.
- Choosing the subclavian vein in a coagulopathic patient — the vessel cannot be compressed.
- Not obtaining a chest radiograph, or obtaining one but not looking at it.
- Leaving a femoral catheter inserted during a cardiac arrest in place for days.