
An arterial line is easy to insert and easy to trust too much. Two errors make the reading useless without anyone noticing: the transducer is at the wrong height, and the system is incorrectly damped. Both are checked in under a minute, and both are routinely missed. The third thing to know by heart is that an arterial line must never be confused with a venous access.
Indications
- Continuous blood pressure monitoring in haemodynamic instability or during ongoing vasoactive treatment.
- Conditions in which blood pressure must be kept within narrow limits: aortic dissection, intracerebral haemorrhage, after cardiac arrest.
- Repeated blood gases, for example during mechanical ventilation or severe metabolic derangement.
- Major surgery with expected blood loss or large volume shifts.
- Patients in whom non-invasive measurement is unreliable: marked obesity, pronounced vasoconstriction, arrhythmia, intra-aortic balloon pump.
- Assessment of stroke volume variation as part of fluid management.
Contraindications
- Infection, burn or trauma over the insertion site.
- Insufficient collateral circulation to the hand.
- Vascular disease in the limb: marked peripheral arterial disease, Raynaud's phenomenon, thromboangiitis obliterans.
- An arm with an AV fistula or with planned vascular access for dialysis.
- Previous vascular surgery in the area.
- Coagulopathy and thrombolytic treatment are relative contraindications and are an argument for a superficial, compressible vessel.
Allen's test is still used in many units to assess the collateral circulation, but the test does not reliably predict ischaemic complications and should not decide the matter on its own. Practice differs between regions and departments; a palpable ulnar pulse and a warm, well-perfused hand carry more weight.
Choice of vessel
The radial artery is the first choice: superficial, easy to compress, with a dual collateral supply to the hand through the palmar arches and the lowest complication rate. The femoral artery is the second choice and is often the best in marked shock or during high-dose vasopressor treatment, when the radial trace may underestimate central pressure. The dorsalis pedis artery works but often shows more pronounced pulse pressure amplification. The brachial artery should be avoided — the collaterals are poor and the median nerve lies close by.
Preparation and equipment
- Arterial catheter, usually 20 G in an adult; a smaller size in children. A set with an integrated guidewire (Seldinger technique) helps when the vessel is difficult to puncture.
- Sterile preparation with chlorhexidine in alcohol 5 mg/mL, sterile drape, sterile gloves, mask and cap.
- Lidocaine 10 mg/mL for local anaesthesia in the awake patient — the anaesthetic also improves the chance of success by counteracting vascular spasm.
- Pressure monitoring set: stiff, short tubing, a transducer, and a flush system with physiological saline in a pressure bag inflated to 300 mmHg, which provides a continuous slow flush.
- Ultrasound with a high-frequency linear probe when the pulse is weak, after previous failed attempts, or in children.
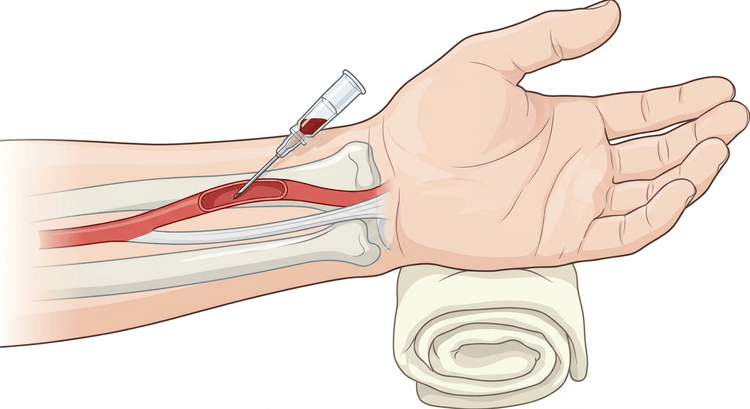
- A rolled towel to place under the wrist, and tape to secure the hand.
Positioning: the wrist extended about 30–45 degrees over the rolled towel, the hand secured with tape. Greater extension makes the artery harder to palpate.
Procedure
Catheter over needle (direct technique)
- Palpate the course of the artery with two fingertips and note the direction. Disinfect and allow to air dry.
- Anaesthetise the skin with a small amount of lidocaine without adrenaline (epinephrine).
- Puncture 1–2 cm proximal to the wrist crease at an angle of 30–45 degrees, directed proximally along the course of the artery.
- When pulsatile blood appears in the hub: lower the angle to close to the plane of the skin and advance a further 1–2 mm so that the catheter tip also lies in the lumen.
- Hold the needle still and advance the catheter over the needle. It should slide in without resistance.
- Remove the needle, compress proximal to the catheter tip, connect the pressure tubing and flush.
Transfixion technique
An alternative when the vessel is small or rolls away: the needle is deliberately passed through both walls of the artery, the needle is removed, and the catheter is then withdrawn slowly until pulsatile blood appears in the hub — the tip is then in the lumen and the catheter is advanced. The technique is effective but leaves more puncture holes in the vessel.
Seldinger technique and ultrasound
After repeated failures: introduce a fine guidewire through the needle when the blood is pulsatile, remove the needle and thread the catheter over the wire. With ultrasound in the transverse plane the artery is identified as a pulsatile, non-compressible vessel; follow the needle tip the whole way. After two to three failed attempts at the same site — change vessel or hand over to someone else; every further attempt increases the risk of spasm and haematoma.
Zeroing and damping check
- Fix the transducer at the level of the atrium: the intersection of the fourth intercostal space and the mid-axillary line (the phlebostatic axis). An error in height translates directly — about 7 mmHg for every 10 cm the transducer is out of position. If the transducer is too low the pressure is overestimated; if it is too high the pressure is underestimated.
- Open the stopcock to air, zero against atmospheric pressure and close it back towards the patient.
- Check the damping with a fast-flush test: pull the flush valve so that the system is exposed to 300 mmHg and release. Assess the trace as the pressure falls back.
- Re-zero with every change of position or bed height, when values are implausible, and according to local routine at handover.
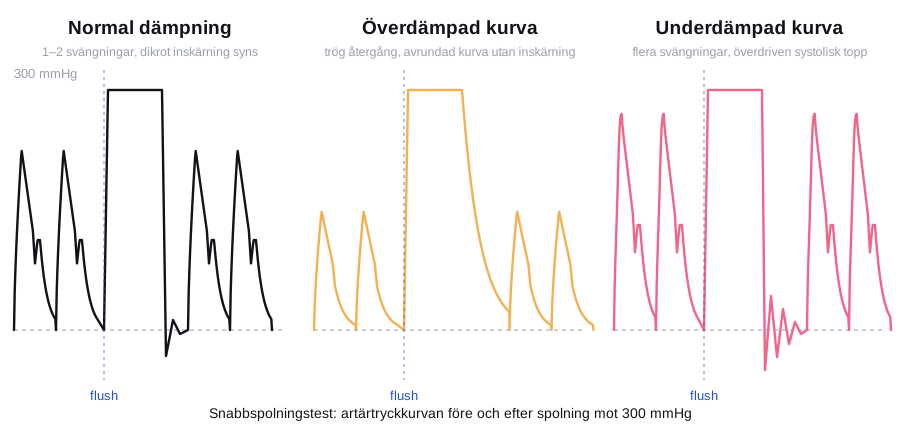
Overdamping is caused by air bubbles, clot, a kinked line, tubing that is too long or too soft, or a half-open stopcock. Underdamping is seen in tachycardia, marked vascular stiffness and long tubing systems. Correct the fault before the pressure is used to guide vasoactive treatment.
Complications
| Complication | Comment |
|---|---|
| Temporary arterial occlusion | Common, usually reversible once the catheter has been removed |
| Persistent distal ischaemia | Uncommon but serious; the risk increases with catheter calibre, dwell time, vasopressor treatment and repeated punctures |
| Haematoma and bleeding | Compress for 5–10 minutes after removal, longer in coagulopathy |
| Pseudoaneurysm and arteriovenous fistula | Above all at the femoral site |
| Infection | A lower rate than with a CVC, but increases with dwell time |
| Nerve injury | Mainly with brachial and femoral puncture |
| Retrograde air embolism | With forceful flushing when there is air in the system — never flush with more volume than necessary |
| Inadvertent intra-arterial injection | May cause severe ischaemia and tissue necrosis |
Label the arterial line clearly and keep it free of injection ports. Drugs are never given into an arterial line.
Aftercare and follow-up
- Check the colour, temperature and capillary refill of the hand at least once every shift and document it. A pale, cold or painful hand means the catheter must be removed immediately.
- Keep the flush system pressurised to 300 mmHg; an empty or unpressurised bag leads to the catheter clotting off and may allow backflow of blood.
- Transparent dressing, daily inspection, changed if damp or soiled.
- Reassess the need daily and remove the catheter as soon as the pressure no longer guides treatment. Routine changes at fixed intervals are not recommended.
- On removal: compress for 5–10 minutes without completely occluding the circulation, then check the peripheral circulation and apply a pressure dressing.
- Calibrate against a cuff blood pressure when there are large discrepancies — but trust the invasive trace once the damping and the zero level have been checked.
Common pitfalls
- The transducer left on the bedside table or taped to the patient's arm when the bed is raised or lowered; the entire measurement shifts.
- Failing to perform a fast-flush test when the pressure differs from the clinical picture.
- Guiding vasopressor treatment by a systolic pressure from an incorrectly damped system — use the mean arterial pressure.
- Too steep a puncture angle, so that the needle passes the posterior wall before blood has had time to appear.
- Stopping holding the needle still as the catheter is advanced.
- Repeated attempts in the same vessel despite haematoma and spasm.
- Forgetting to check the hand in a patient who is sedated and cannot report pain.
- Confusing the arterial line with a venous access. Label it, document it and hand it over.