
In acute circulatory failure it is not the number of cannulae that matters but the flow per unit time. A large-bore, short cannula in a large vein gives many times the flow of a fine needle, and collapsed veins mean that the fine needle is in addition the only one that will go in. The rule that saves time is simple: two attempts or 90 seconds — then go intraosseous.
Indications
Peripheral venous cannula:
- Intravenous drug treatment, fluid or blood products.
- Contrast medium for CT (this requires a large-bore cannula in a suitable vein).
- Standby access in a patient at risk of rapid deterioration.
Intraosseous access:
- Cardiac arrest where venous access is not immediately available.
- Shock, severe trauma, burns or status epilepticus when peripheral access fails or is judged futile.
- Children in an emergency, where peripheral venous access often takes too long.
Intraosseous access accepts all drugs, fluids and blood products that can be given intravenously, at the same dose. Blood samples can be taken at insertion; a blood gas and electrolytes can be interpreted, but some laboratories do not accept marrow blood in their analysers — check locally.
Contraindications
Peripheral venous cannula:
- Infection, burns or trauma at the puncture site.
- An arm with an arteriovenous fistula, previous axillary clearance or lymphoedema.
- A limb with paresis or marked swelling.
- A vein suspected of thrombosis or previously thrombophlebitic.
Intraosseous access (absolute, for the bone in question):
- A fracture of the bone to be punctured, or a major injury proximal to the puncture site.
- A joint prosthesis or orthopaedic metalwork in the area.
- A previous intraosseous attempt in the same bone within the past 24 hours — the fluid leaks out through the old hole.
- Infection or burns over the puncture site.
- Osteogenesis imperfecta and severe osteoporosis (relative).
- An inability to identify the landmarks.
Choice of vein and cannula size
Choose the veins of the forearm for planned treatment: they are stable, they disturb the patient least, and they save the antecubital fossa for next time. The antecubital fossa gives a high flow but the cannula kinks when the arm is flexed. The dorsum of the hand is suitable for finer cannulae. Avoid the lower limb in adults. In shock with collapsed vessels, the antecubital fossa or the external jugular vein are the vessels that can most often still be punctured — and ultrasound makes the deep forearm veins accessible to those who are experienced.
| Size | Colour | Approximate flow | Typical use |
|---|---|---|---|
| 14 G | Orange | 250–300 mL/min | Massive haemorrhage, rapid volume replacement |
| 16 G | Grey | 150–200 mL/min | Trauma, major surgery |
| 18 G | Green | 90–100 mL/min | Blood transfusion, contrast medium |
| 20 G | Pink | 55–65 mL/min | The standard for most adults |
| 22 G | Blue | 30–36 mL/min | Fragile veins, older people, children |
| 24 G | Yellow | 15–20 mL/min | Neonates and small children |
The flows apply to water by gravity according to the manufacturers' standard measurements. Blood and colloids flow more slowly, and every additional length of tubing, every tap and every filter reduces the flow further — it is the whole system, not just the cannula, that determines how quickly the volume reaches the patient.
flowchart TD
  A[Acute circulatory failure] --> B{A peripheral vein visible or palpable?}
  B -- Yes --> C[A large-bore 14-16 G cannula in the antecubital fossa or forearm]
  B -- No --> F[Two attempts, or 90 seconds elapsed]
  C --> D{Does the cannula work?}
  D -- Yes --> E[Continue treatment, preferably with a second cannula]
  D -- No --> F
  F --> G[Intraosseous access: the proximal tibia or the head of the humerus]
  G --> H{Has the patient been stabilised?}
  H -- Yes --> I[Establish secure venous access and remove the intraosseous needle within 24 hours]
  H -- No --> J[A central venous catheter by an experienced operator, femoral during ongoing CPR]
Preparation and equipment
- Cannulae in several sizes, a tourniquet, chlorhexidine in alcohol 5 mg/mL, gauze, a transparent dressing, an extension set with a three-way tap, and saline for flushing.
- An intraosseous drill system with needles in three lengths: short for children and slim limbs, medium for most adults, long for thick soft tissue and for the head of the humerus.
- A pressure bag or a 50 mL syringe with a three-way tap — intraosseous flow requires pressure; gravity is not enough.
- Lidocaine 10 mg/mL to anaesthetise the marrow cavity in a conscious patient.
- Fixation material for the intraosseous needle.
Procedure
Peripheral venous cannula
- Apply the tourniquet 10–15 cm proximal to the intended puncture site, let the arm hang, ask the patient to pump with the hand, and palpate for a vein that is compressible and springs back — a hard, thin cord is a thrombosed vein.
- Disinfect the skin and let it air-dry.
- Stretch the skin distal to the vein with the thumb and puncture at an angle of 10–30 degrees with the bevel upwards.
- When blood appears in the chamber: lower the angle, advance a further few millimetres so that both the needle and the cannula lie in the vessel, then hold the needle still and advance the cannula.
- Release the tourniquet, compress over the cannula tip, withdraw the needle and dispose of it directly into a sharps container.
- Attach the extension set, flush with saline and check that it runs easily and painlessly without swelling.
- Secure with a transparent dressing so that the puncture site remains visible, and document the size, the site and the date.
Intraosseous access
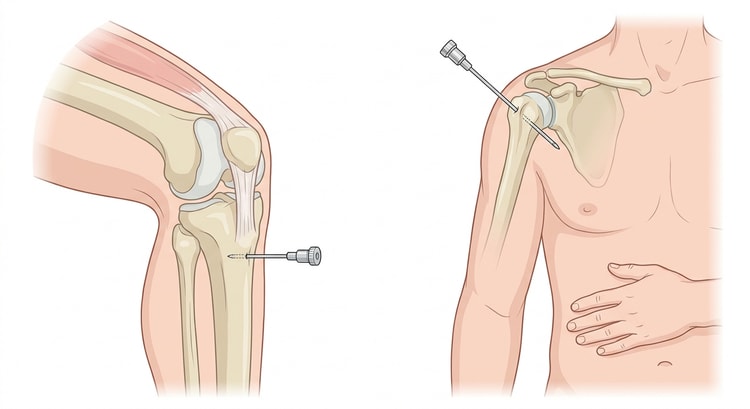
The proximal tibia (adult): the puncture site lies on the flat medial surface of the tibia, approximately two centimetres medial to and two centimetres below the tibial tuberosity. In children: one to two centimetres below and medial to the tuberosity, and in small children in whom the tuberosity cannot be palpated, one to two centimetres below the lower border of the patella on the flat medial surface of the bone. The needle is directed perpendicular to the bone surface and slightly away from the growth plate.
The head of the humerus (adults and older children): the arm is placed adducted with the hand on the abdomen so that the humerus is internally rotated. Palpate the prominent bony tubercle on the anterior aspect of the humeral head, one to two centimetres above the surgical neck. The needle is directed obliquely downwards at about 45 degrees towards the opposite hip. This site gives a higher flow and less pain on infusion, but it dislodges more easily when the patient is moved.
The distal femur (chiefly in children): in the midline on the anterior aspect of the thigh, approximately one to two centimetres above the upper border of the patella, with the needle directed slightly upwards away from the joint.
- Choose the needle length according to the soft tissue thickness. Disinfect. Anaesthetise the skin in a conscious patient.
- Advance the needle through the skin without drilling until the tip meets bone. Check that at least one marking on the needle is visible outside the skin — otherwise the needle is too short and must be changed.
- Drill with even, light pressure until the resistance suddenly gives way. Do not drill further.
- Remove the driver, unscrew the stylet and dispose of it. Secure the needle.
- Confirm the position: the needle stands firmly in the bone on its own, and the flush goes in without the soft tissues swelling. Aspiration of marrow does not always succeed and is not necessary for the position to be correct.
- In a conscious patient: give lidocaine 10 mg/mL slowly into the marrow cavity and let it act for about a minute before flushing — the flush is otherwise very painful.
- Flush vigorously with saline, about 10 mL in an adult and 5 mL in a child. Without this flush the marrow cavity does not open and the infusion will not run.
- Connect the infusion to a pressure bag, or give drugs as a bolus by syringe. Flush after every drug.
Complications
Peripheral cannula: extravasation with tissue injury (particularly with irritant drugs), thrombophlebitis, infection and, rarely, a catheter fragment embolising. Pain on infusion is extravasation until proven otherwise — disconnect and inspect; do not flush harder.
Intraosseous access: extravasation into the soft tissues with a risk of compartment syndrome is the most important complication and is almost always due to the needle having passed through the opposite cortex or having become dislodged. Others: fracture, osteomyelitis (uncommon with a short dwell time), fat embolism and growth plate injury from a wrongly directed needle in a child. Inspect and palpate the calf or the upper arm repeatedly during the infusion.
Aftercare and follow-up
- The peripheral cannula is inspected at least once per shift for redness, swelling, tenderness and leakage; remove it at the slightest sign of thrombophlebitis and change to another vein.
- A cannula placed under emergency, uncontrolled conditions must be changed as soon as the situation allows. Procedures for planned changes at fixed intervals vary between regions — follow the local guideline.
- The intraosseous needle must be removed as soon as secure venous access is available, and at the latest within 24 hours. It is withdrawn with a syringe attached to the hub and a straight, rotating movement; compress the site and apply a dressing.
- Document the puncture site, the time of insertion and the time of removal of the intraosseous needle, and which drugs were given through it.
Common pitfalls
- Continuing to attempt a peripheral cannula in a patient in shock. Set a time limit before you start, and keep to it.
- Choosing a fine cannula "because it will go in" when the indication is volume replacement.
- Forgetting to release the tourniquet — a common reason for an infusion not running.
- Not flushing the intraosseous needle vigorously before the infusion.
- Giving lidocaine into the marrow cavity in a conscious patient but not waiting for it to take effect.
- Not anaesthetising at all in a conscious patient — the insertion is tolerated; the flush is not.
- Leaving the intraosseous needle in place once the patient has central access.
- Failing to notice that the needle is in the soft tissues because the position was confirmed only by an attempt at aspiration.