
A dislocation is reduced with muscle relaxation, not with force. The methods that work best exploit time, gravity and slow movement; those that fail usually do so because the patient tenses up with pain, or because the operator pulls harder rather than more slowly. The neurovascular status must be documented before and after every attempt at reduction — otherwise it is impossible to determine afterwards whether a nerve injury was caused by the injury or by the treatment.
Indications
- A clinically or radiologically confirmed dislocation of the shoulder, elbow, finger, patella, jaw or hip prosthesis.
- A dislocation with neurovascular compromise or skin tenting — reduce promptly, before radiography.
The longer a joint remains dislocated, the harder the reduction becomes and the greater the risk of chondral and neurovascular injury. Aim for reduction within a few hours.
Contraindications
- A fracture-dislocation requiring operative treatment — contact an orthopaedic surgeon before attempting reduction.
- Posterior shoulder dislocation, which is often associated with fracture and requires an orthopaedic surgeon.
- Dislocation of a native hip (as opposed to a prosthesis) — a high risk of avascular necrosis of the femoral head and of vascular injury; always an orthopaedic surgeon, and usually general anaesthesia.
- An open dislocation.
- Inadequate analgesia or sedation — the procedure must not then be started.
Radiography before reduction
A radiograph is taken before reduction in a first-time dislocation, so as not to reduce a fracture-dislocation or to miss a posterior dislocation. The exceptions are an obvious recurrent dislocation in a patient with known instability and a low-energy mechanism, and a neurovascularly threatened limb in which reduction cannot wait.
A radiograph after reduction is always taken — to confirm the position and to detect fractures that have occurred or been unmasked.
flowchart TD
  A[Suspected dislocation] --> B[Neurovascular status: sensation, motor function, pulse, capillary refill]
  B --> C{Neurovascularly threatened, or skin tenting?}
  C -- Yes --> D[Reduce immediately, radiograph afterwards]
  C -- No --> E{A first-time dislocation?}
  E -- Yes --> F[Radiograph before reduction]
  E -- No, a known recurrent dislocation --> G[Reduction without radiography is possible]
  F --> H{A fracture-dislocation?}
  H -- Yes --> I[Contact an orthopaedic surgeon]
  H -- No --> J[Analgesia and reduction]
  G --> J
  D --> K[Repeat the neurovascular status]
  J --> K
  K --> L[Radiograph after reduction]
  L --> M[Immobilisation and follow-up]
Preparation and equipment
- An examination couch that can be lowered, preferably allowing the prone position.
- Monitoring: pulse oximetry, blood pressure, ECG and capnography during sedation, with oxygen and a bag available.
- Drugs for procedural sedation and analgesia according to local practice and the guidelines of the Swedish Society of Anaesthesiology and Intensive Care Medicine (SFAI), together with the antidotes.
- Material for immobilisation: a shoulder sling, a dorsal backslab, and a colleague to help.
Analgesia and sedation
The options, in ascending order:
| Method | Comment |
|---|---|
| A calm environment, time, a slow technique | Underestimated. Methods such as Cunningham's work best with no sedation at all |
| Oral or intravenous analgesia | An intravenous opioid, titrated, preferably with an antiemetic |
| Nitrous oxide | Rapid onset and offset; the patient cooperates |
| Intra-articular local anaesthesia | Lidocaine into the glenohumeral joint in shoulder dislocation, with an effect equivalent to sedation and fewer adverse effects |
| Digital nerve block | The standard in finger dislocation |
| Procedural sedation | Propofol, ketamine or a combination. It requires a fasting history, two people, full monitoring and airway preparedness |
With procedural sedation, one person must manage the sedation and another the reduction. Check the fasting status, the ASA class and the airway beforehand.
Procedure
Anterior shoulder dislocation
The commonest of all dislocations. There is a hollow beneath the acromion, the arm is held in slight abduction and external rotation, and the patient resists internal rotation. Check the axillary nerve: sensation over the lateral part of the deltoid before and after the reduction, together with the distal pulse and sensation throughout the arm.
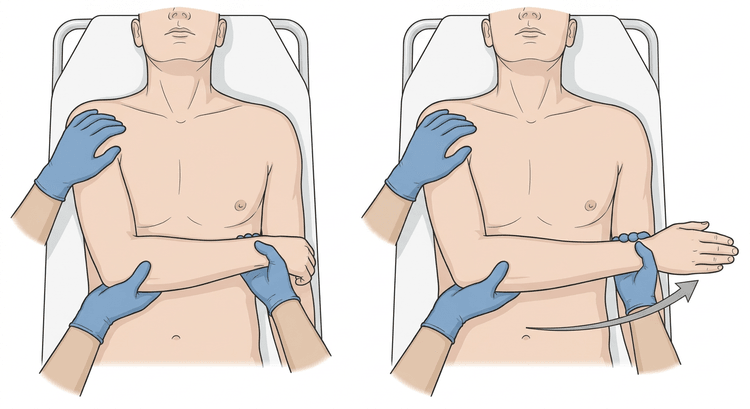
External rotation (the Hennepin technique). The patient lies supine or sits. The upper arm is held adducted against the trunk and the elbow is flexed to 90 degrees. The forearm is moved very slowly outwards in the horizontal plane, with pauses each time the patient tenses, until the joint slides back — usually at 70–110 degrees of external rotation. No traction is needed. The method often succeeds without sedation.
The Cunningham technique. The patient sits upright with the arm adducted and the hand resting on the examiner's shoulder. The examiner massages the muscle belly of the long head of biceps in the upper arm while the patient is encouraged to draw the shoulders back and down and to relax. It is gentle, needs no sedation, and takes a few minutes.
The Stimson technique. The patient lies prone with the injured arm hanging freely over the edge of the couch. A weight of 3–5 kg is attached to the wrist. After 10–20 minutes the musculature has fatigued and the joint usually slides back spontaneously. Time-consuming but very gentle.
Traction methods with pull along the axis of the arm against counter-traction also work but require more sedation and carry a greater risk of fracture and nerve injury. Kocher's classical leverage manoeuvre should be avoided because of the risk of humeral fracture and nerve injury.
Elbow dislocation
Almost always posterior. Check the brachial artery and the median, ulnar and radial nerves before and after. Reduction is performed under good analgesia or sedation: an assistant provides counter-traction over the upper arm while the examiner pulls slowly along the axis of the forearm with the elbow in slight flexion and at the same time pushes the olecranon forwards and distally with the thumbs. The joint returns with a distinct clunk. Then test stability and range of movement, and immobilise in a dorsal backslab with the elbow at 90 degrees.
Finger dislocation
Usually a dorsal dislocation of the PIP joint. A digital nerve block first. Hold the proximal phalanx, first accentuate the deformity slightly, and then push the base of the middle phalanx distally and volarly back into place — do not pull straight on the finger, which can trap the joint capsule or a sesamoid. Afterwards check active movement, lateral stability and that the extensor tendon works. Immobilise with buddy taping or a short dorsal splint.
Patellar dislocation
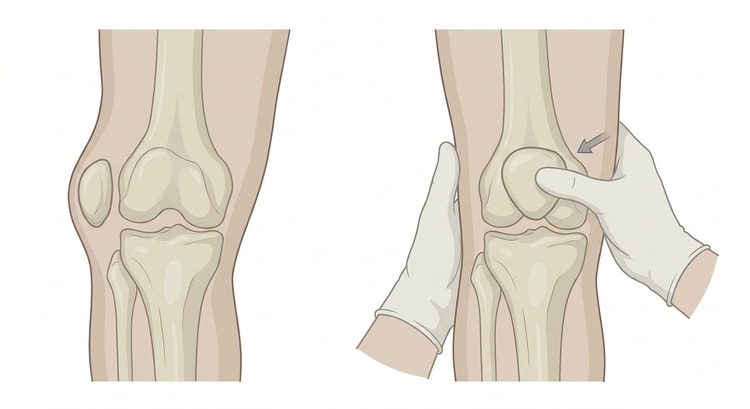
Almost always a lateral dislocation. Analgesia and calm are often enough. Extend the knee slowly while the quadriceps relaxes, and push the patella medially with the thumb over its lateral border. The joint often reduces spontaneously as the knee is extended. A radiograph afterwards to exclude an osteochondral fracture.
A dislocated hip prosthesis
Usually a posterior dislocation: the leg lies adducted, internally rotated and shortened. This is an orthopaedic procedure and is almost always performed under general anaesthesia or deep sedation with muscle relaxation, with the patient supine and the pelvis fixed while the hip is flexed to 90 degrees and traction is applied along the axis of the thigh. Contact the on-call orthopaedic surgeon — do not attempt to reduce a prosthetic dislocation without muscle relaxation. Check sciatic nerve function before and after.
Complications
- Nerve injury: the axillary nerve at the shoulder, the ulnar and median nerves at the elbow, the sciatic nerve at the hip.
- Vascular injury, above all to the brachial artery in elbow dislocation.
- Fracture during the reduction, particularly with forceful traction and leverage methods.
- Osteochondral injury and later osteoarthritis.
- Recurrent dislocation — 60–90 per cent in competitive athletes under 25 after a first shoulder dislocation, and considerably lower in older patients.
- Persistent instability and rotator cuff tears, commoner in patients over 40.
- Complications of sedation: respiratory depression, aspiration, hypotension.
Aftercare and follow-up
- Shoulder: a sling for pain relief for 1–2 weeks. Immobilisation does not reduce the risk of recurrence. Early mobilisation and physiotherapy. Reassessment after a week or so; in a patient over 40 the rotator cuff must be assessed, and in younger patients orthopaedic assessment for instability should be considered.
- Elbow: a dorsal backslab at 90 degrees for a few days to a week, then early mobilisation to avoid contracture.
- Finger: buddy taping and early mobilisation; a check of movement after a week or so.
- Patella: a knee orthosis or splint in extension for a few weeks according to local practice, then quadriceps training.
- Hip prosthesis: the orthopaedic unit's routine with dislocation precautions; repeated dislocations may require revision.
Always document the neurovascular status before and after, which method was used, what sedation was given, and the result of the radiograph after reduction.
Common pitfalls
- No documented axillary nerve function before the reduction.
- Reduction without a radiograph in a first-time dislocation, with a fracture-dislocation missed.
- Too much force and too little time. Muscle relaxation is the whole point.
- Inadequate analgesia, which makes the patient impossible to reduce.
- No radiograph after the reduction.
- A missed posterior shoulder dislocation in a patient after a seizure or an electric shock — the arm is locked in internal rotation and the shoulder can look almost normal on the frontal view.
- Prolonged immobilisation of the elbow, which causes a permanent extension deficit.